Tuesday, April 26, 2016

April 26 to May 17

The Schedule in April May

Wet Plate Demo Thursday April 28

Lisa Dodge, California Ranches, Wet Plate Collodion Photographs

Wet Plate Collodion Artist Lisa Dodge will be giving an open demonstration of Wet Plate technique in the Photo Lab of Cal State Northridge on April 28, 2016 at 6:00PM. 


Lisa is an expert in the field of wet plate photography and is especially well known for her depictions of ranching culture and the American west. Subjects that typically do not hold still for wet plate collodion photographs. Lisa will be pouring plates and exposing them with the setting sun using a 19th century camera and then developing the plates in the CSUN Darkroom under the safelights so all can see the whole process. 

See more of Lisa’s work on her website: http://www.lisadodge.com

Lisa Dodge, Iron Horses, Wet Plate Collodion Photographs

Thursday, April 14, 2016

UP or DOWN and CHANGE

The final weeks are upon us. Here are the last two assignments: UP or Down  and Change. Crit for both assignments is May 3, 2016.

You should also be working on your Final. The final for 455B/C is a printed portfolio book with the best images from your class assignments and other images that show your personal style.


Thursday, March 17, 2016

White Product Demo

March 17 lighting demo of a simple white background photo of a black and chrome subject with three lights. The trick is to get the image virtually shadowless with no retouching.

The largest softbox on a boom above and behind the subject. a strip box between camera position and the background in front of the subject. and a grid spot with snoot on a low stand to punch light into the front of the subject where needed. All photographed on old Polaroid45B with a Nikkor 120mm AM ED Macro lens on a Cambo 4x5.
Thanks for the help with setup and strike Jake and Ruben!

Friday, March 11, 2016

NEW STUDIO TECHNIQUE


A new technique for studio photos:

New technique F = No Softbox or Umbrella.

I’m adding a new technique to the list of 5. There are still two freebees, but I heard you when you said most of the techniques are outdoor and not for studio photos. So here’s a new studio-centric technique for you: Strobe lighting one of the assignments in the studio without using a softbox or umbrella anywhere in the photograph. You can bounce off V-flats or walls or fill cards or ceilings, just use 20” beauty dishes, 7” and 10” reflectors and grids or even bare tubes.

Here’s a recap of all the techniques:

A= Sun In / Daylight & Tungsten / Mixed lighting. Either the actual sun is in the frame, or there is a indoor/outdoor mix of tungsten light inside and daylight outside. Or mixed artificial lighting: When there is a continuous light source like street lights that you match or overpower by bringing in your own light to contrast the light you can’t control.

B= Overpower Daylight or Perfect fill flash. Either use a strobe outdoors in the day and overpower the ambient daylight with the high output of the strobe on your subject to make the ambient light underexposed. Or in a situation with low light on your model, use a strobe or speed light to add subtle  imperceptible fill light to expose the model perfectly. Show before and after fill light in the HERO blog post.

C= Dusk Dark. Photograph when the sunrise or sunset light matches the light from inside a building or streetlights or a drum circle, etc... This is about waiting for that perfect moment when the sky and interiors match. If the sky is black you waited too long.

D= Analog. Photograph using film or Polaroid or some other non-digital process.

E= Make It. Make the thing you are photographing. The subject, the model’s clothing, the set, the props, etc...

F= No Softbox in Studio. Strobe lighting one of the assignments in the studio without using a softbox or umbrella anywhere in the photograph. You can bounce off V-flats or walls or fill cards or ceilings, just use 20” beauty dishes, 7” and 10” reflectors, bare bulbs, aluminum foil, home-made lights or grids and snoots.

Freestyle 1. Two assignments can be done as you wish.
Freestyle 2. Two assignments can be done as you wish. 

Notes from LIGHTING lecture.

The three interconnected qualities of light:
Size, Direction and Distance.

Here are the drawings and notes from last night’s lighting lecture...
The photos should enbiggen if clicked.
Kelvin and CRI 
Basics about light modifiers for strobes and lights.
Softboxes, umbrellas, and grid spots. + Polarizers.


Notes From Class: "Income/Expense" lecture.


Here are the notes from 455B/C class from the freelance business income and expense lecture. 
The photos should enbiggen when clicked.

Why $52,000 a year? Because it's easy math: One job every week. The basic premise is that you earn $1000 every week for all 52 weeks a year (one $1000 job or four $250 jobs). Some weeks you'll do more, and some you'll do fewer, but that's an easy number to examine on average. If you want to make $104,000 a year, you'll need to charge double or do two jobs a week. If you have a day job, you may only have half the income per week from your photography. Depending on the type of work you do, those jobs could take a couple hours to complete or a full day or they might take planning, scouting, pre-production, travel, setup, shoot, strike, travel, post production, editing, retouching, uploading and delivery that take seven days for one project.

$52K a year in income...  $1000 job every week, it's week seven of class,
have you done seven jobs at $1000 each this year? 
Editorial rates (magazine work) are usually the lowest but allow you to resell your images to multiple outlets and stock. Advertising and Fashion are hard to break into but have high day-rates. Stock photo sales of previous jobs are a good way to bring in extra cash from finished projects that another client already paid for or editorial outtakes, or you could focus on making stock images "on Spec" that you feel would be popular and hope they sell enough to pay for your time and expenses and also make a profit. Weddings and Family portrait studios can get contracts for school portraits and seniors that bring in a known income over the school year but these are fiercely competitive. Family portrait studios can also build long term relationships over twenty years and photograph the generational "Family Circle." Senior portrait > begets engagement photo > begets wedding photo > begets new baby photo > begets family portrait > begets senior portrait > lather > rinse > repeat. The Family Circle was more prevalent 20 years ago but if a studio photographer can build a long-term family relationship that is strong enough, it still works.

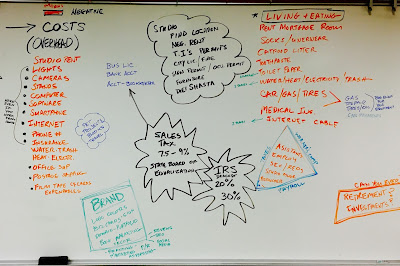
From cameras to coffee filters.
OVERHEAD is the costs, taxes, fees and expenses that it takes to run a business.

On the cost side of the equation, if a photographer's GROSS income is $52K then there are a million ways to spend that income on OVERHEAD. Everything from the big ticket items: Studio Rent, Equipment, Marketing, Insurance and Taxes to the small stuff: toilet paper, gaff tape, paper clips and monthly charges like utilities, internet, mobile phone, software, and memberships.

The difference between the GROSS $52,000 that you make and the costs, expenses, overhead that you pay to run your studio is your NET income. In other words NET income is the money left over after all the expenses and taxes are paid. When photographers brag "I made $200,000 dollars last year!" I like to ask, "Is that NET?" As photographers we can easily spend most of the income from our career on expenses like getting new clients and buying new fancy cameras and lights. If you make $52,000 GROSS a year, you'll soon see how easy it is to spend $42,000 per year on OVERHEAD, leaving you a NET of $10K. 

If you work all year for a $10K NET you could calculate that in hours (The standard American 40 hour x 52 weeks = 2080 hours). You'll find your hourly wage is $4.80 per hour with no benefits, retirement or healthcare. Even that fancypants photographer that "Made $200,000 last year," may have only had a NET income of $20,000 (and that's about minimum wage).

Wednesday, March 2, 2016

March DIRECTION and TIME Assignments

Two assignments. "TIME" and "DIRECTION" HEROs are due April 5 at 5:00PM.

Time can be the passage of time, clocks, sundials, time lapse, age, multiple exposures or sequences of a photo to show the progression of time, etc. 
Direction can be GPS, maps, compass, trails or roads, tunnels, or integrate directional signage or arrows. You could also force yourself to photograph in a direction you have never used before: straight up, under, straight down, from a high vantage point, or while moving. 

Sunday, February 21, 2016

The HERO post template

The Hero Photo post is the place where you present your photograph to the client (and the world).

"Impress Me... Make Me Care, Tell Me A Story"

It should follow a format that puts the final photo at the top. 
(making it the icon or thumbnail for your post on mobile devices)
A nice touch is to add captions to each picture too. (Photo by: Morgan DiLallo)
Info: 24-120mm zoom at 85mm. 1/100 at f7.1 (ISO100)

The Hero post should contain 3 or more images... HERO + 2 supporting images. And 200 or more words telling about the project and photo.

Basic blog format.

For this example, I could talk about Morgan and how she reluctantly agreed to be the photographer for my idea. Or I could describe the photoshopping that was done to the final file. Or I could talk about how we had a false start when my old Nikon 85mm lens wouldn’t stop down, so we had to switch to a 24-85mm zoom. If you want to impress the client (me) you can always show more photos and say more about them...

The additional images can be before & after Photoshop examples...
Before Photoshop and tighter cropping. (Photo by: Morgan DiLallo)

A description of the retouching might be appropriate. Here I lightened the facial light and the book light. The face was warmed and the book was saturated. The background rimlight was toned down and the color temp was cooled to give it color contrast from the warm face. Little hairs and dust on the book were cloned out, and my hand was darkened so it wouldn’t stand out. Then the image was rotated and cropped tight to make it more dynamic. 

Or include sketches or lighting setups...
Final lighting setup for portrait.

Snaps of the final lighting setup or studio during the photography...

Top: 85mm lens malfunction.
Bottom: Hairlight needed a gobo.


Or before & after makeup with your models...
Jake stood in as a model
while we figured out the lights.

Saturday, February 20, 2016

BLOG POST FORMATING


The basic template for blog posts.

Photo 455B/C assignments should be completed in the following blog format:


Ongoing photographic assignments will be given as “client briefs,” and require two parts, a “pre-project proposal” and a “Hero photo.” All assignments shall be submitted as blog posts on a public blog/website set up by you and shared with the instructor. Work will be graded from this online presentation. The blog will also be viewed and discussed in class as projected images.
  • Part 1: All projects require a “pre-project proposal” post. (3 images + 200-300 words.)
  • Part 2 “pre-project proposals” need to be approved by the client (professor) -send an email when your post is live for feedback from professor. 
  • Part 3: All projects require a “Hero photo” post. (Hero photo + Two supporting images and 200+ words.)
  • Part 4: “Pre-project proposal” and "Hero photo” posts will be graded as one completed assignment.
Make all images 2048 pixels on the long dimension.

Pre-project proposal.

The “pre-project proposal” should be formatted like a public online blog post. Text length about 200-300 words. It includes a written description of the photo concept and at least three (3) supporting images illustrating the concept (sketches, tear-sheets, scouting photos, etc.). The detailed written “pre-project proposal” is required before each final photograph is begun. The client (professor) will review each “pre-project proposal” online and offer comments and suggestions and approve or modify the idea just like a potential “Client” world.  Once your Pre-project proposal is uploaded, send me a link via E-mail. The client (professor) will give these comments and changes via e-mail and then the student should plan and create the final Hero photo from that new brief.


I’ll need about 24 hours to reply to your Pre-project proposal. 
If you need your feedback in a hurry because of impending weather or access to models, let me know in the subject line of your Email.


HERO blog post.

The “Hero photo" post must obviously include the final “HERO” photograph requested by the client (professor) at the top of the post, in the highest resolution viewable by your blog. In addition, supporting information should include text of about 200+ words describing the execution of the Hero view with lessons learned, problems solved, delays encountered, frustrations, epiphanies, your ideas, inspirations and a description of how you would improve the photo if you were to do it again. Include at least two (2) additional images like lighting sketches, rejected frames, variations, “first-frame” photos, pre-Photoshop images, lighting-setup images, etc.
Once your Hero is uploaded, send me a link via E-mail.


CSUN Art 455B/C | Advertising Photography | Spring 2016

Thursday, February 11, 2016

February 455 B/C Class Schedule


Please Email me at stephen.schafer@csun.edu to sign up for in-class T-Th > 7-10pm studio time slots. There are three possible sets in the studio and classroom we can utilize each night and possibly more outside around the buildings. You would be well advised to pair up with a studio buddy and share time-slots. First-come first-served. 

If all three studio slots are not reserved on a night, I will be doing lighting demos, gel demos, tungsten demos, etc., in the empty studio areas. So it really pays to come to all class sessions. If all three studio slots fill up with student projects, I'll send out an email that morning so that students not scheduled that night in-studio can miss class. However I will be doing lighting tweeks and improvements to all studio users so there will still be the opportunity to watch, learn and ask questions if you choose to come and watch. If only one or two people sign up, I'll use the classroom for a short mini-demo. 

Monday, January 25, 2016

Syllabus for Advertising Photography -ART 455 B/C

California State University Northridge
Art 455 B & C. Spring 2016. Advertising Photography II and III
Faculty: Stephen D. Schafer


Final Class Assignment and Grading Matrix